![]()
TECHNICAL SUPPORT PAGE
XPT-1000
-
Please follow the cleaning instructions printed on the machine as well as the User Manual to help prevent build up of pretreatment.
-
At a minimum use water or hot tap water (if possible) to flush the system out daily, This can help prevent build up.The hot water will help flush the pretreat out better vs. room temp water.
- Viper 1000 User Manual (PDF)
- Spray head cleaning (PDF)
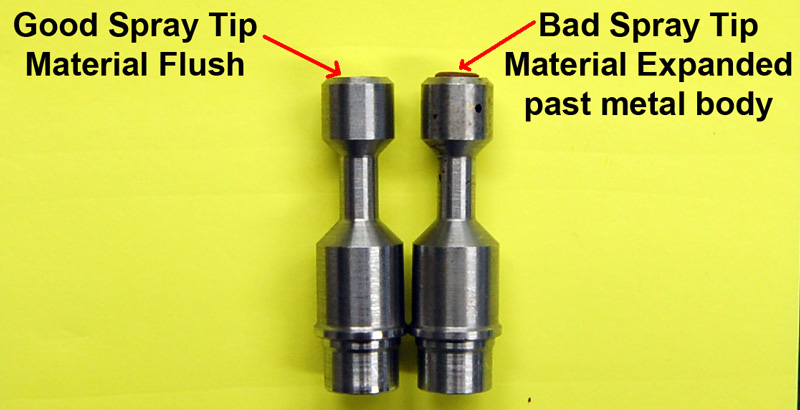
- Spray head plunger swelling (PIC)
- With the Fluid Solenoid shown in the PDF in the exploded view the tubing should go:•Pretreatment line (A) will go to the right side elbow.
•The Water line (B) will go to the top elbow
•The Third line (D) is from the bottom elbow to solenoid #2To clean Solenoid #2 do the same steps but the lines will go:
•Right side elbow (D) goes to solenoid #1 bottom elbow
•The Cleaning line (C) will go to the top elbow
•The bottom elbow (E) will go to the pump - Fluid solenoid cleaning (PDF)
- Pump Disassembly (PDF)
- If you are getting an hourglass shape spray pattern:(1) Make sure your tubes a seated fully.(2) Check the tube so that it is submerged into the fluid and wipe off any debris.
- If you are getting a grinding sound during travel forward or reverse OR spray head turns on and off during spray:
(1) Check the wires inside the chain by taking the lid off and the bellow support out.
•The chain can open up by the ribs to access the inside.
(2) If there is any wires broken from a connector or the wire has cracked/split it will need replaced or repaired.
• If you cannot pump either pretreat/water/cleaning solution or all:
By-pass the fluid solenoids by connecting an external line (pretreat/water/or cleaning) to the inlet side of the pump by the clear tube (there should be a union about 3-4" from the pump)
->If that works and you can pump fluid through then disassemble the fluid solenoids.
->If that does not work then disassemble the pump and spray head.
Viper MAXX
-
Please follow the cleaning instructions printed on the machine as well as the Video Guide to help prevent build up of pretreatment.
-
At a minimum use water or hot tap water (if possible) to flush the system out daily, This can help prevent build up.
The hot water will help flush the pretreat out better vs. room temp water. If you have very "harsh" or "bad" water, please use distilled water.
- Viper MAXX QUICKSTART Manual (PDF)
- Viper MAXX SPRAY Step Test Instructions (PDF) - Version HMI5001 PLC3020 or newer
- Viper MAXX Advanced Menu User Manual HMI5001 PLC3020 or NEWER (PDF)
- Viper MAXX Advanced Menu User Manual (PDF)
- Spray head cleaning (PDF)
- Spray head plunger swelling (PIC)
- Pump Disassembly (PDF)
- Bar Code API - How To Set Up Bar Codes to Work with the MAXX (PDF)
- Bar Code Sample Quick Scan Cheat Sheets (PDF)
- SPRAY STEP TEST PDF 11g - 35g (United States Version for INCHES) - (PDF)
- SPRAY STEP TEST PDF 11g-35g (Universal Version for METRIC users) - (PDF)
- SPRAY STEP TEST PDF 11g - 21g (United States Version for INCHES) - (PDF)
![]()
ViperONE AIR (Legacy Model)
![]()
ViperONE Electric (Legacy Model)
With Fluid Solenoid shown in the PDF above in the exploded view the tubing should go:
•Pretreatment line (A) will go to the right side elbow.
•The Water line (B) will go to the top elbow
•The Third line (D) is from the bottom elbow to solenoid #2
To clean Solenoid #2 do the same steps but the lines will go:
•Right side elbow (D) goes to solenoid #1 bottom elbow
•The Cleaning line (C) will go to the top elbow
•The bottom elbow (E) will go to the pump
- Spray Head Cleaning (PDF)
If you are getting an hourglass shape spray pattern:
(1) Make sure your tubes a seated fully.
(2) Check the tube so that it is submerged into the fluid.
- Pump disassembly (PDF)
![]()
Viper XPT-6000 (Legacy Model)
For self diagnostics please check symptoms you are having then clean the following parts. There are PDFs to help you along the way.
Please pay attention to how you take any of the following parts apart. Some models may vary from what the PDFs show!
- ViperXPT-6000 User Manual (PDF)
- ViperXPT-6000 Plumbing Diagram (PDF)
- Symptoms: Loss in pressure, gaps in your spray pattern or pump not working.
- Symptoms: Loss in pressure or bad spray from one spray head.
- Spray Head Cleaning (PDF)
- Understanding the Causes of Spray Tip Wear (PDF)
- Spray Head Plunger Swelling (PIC)
If plunger is swollen it will need to be shaved down to become flush with the metal body.
Use a fine grit sandpaper to sand down the rubber tip.
- Symptom: Low battery warning on Screen.
- Replacing HMI Screen Battery (PDF)
- Symptoms: Platen stops and emits a loud tone or stops then continues to move.
- `Accessing Drive System for Cleaning (PDF)
- Square Rail Bearing Cleaning (PDF)
- Symptoms: All 6 spray heads aren't spraying or clicking
- Resetting Spray Pulses (PDF)
- ELC battery location replacement (PDF)
- ELC re-upload dongle instructions (PDF)
- Resetting the HMI after loading dongle (PDF)